| Author |
Message |
|
|
Post subject: PSP 9 Help  Posted: Posted: December 3rd, 2005, 6:14 am |
|
Joined: 29 November 2005
Posts: 149

|
I have just got into the art of making sigs...I have been admiring now and I want to contribute....I was hopeing someone could help me get going...This program looks really complicated....I have done one sig as a start just to test things but its nothing...here is a preview
http://img5.picsplace.to/img5/15/Imagestevie.jpg
don't laugh at me...lol. Its not good but its a start... 
I don't understand how to layer or when i paste a transparent image how to get the marquee affect to go away....I am really lost with everything and there are some great artisits here....just hope someone can help
Thanks
|
|
| Top |
|
 |
|
|
Post subject: Posted: December 3rd, 2005, 11:10 am |
|
Joined: 13 August 2005
Posts: 2567
Location: Michigan
|
Well, I know the feeling. I actutally only figured out how to use it in the last month, so I'll admit that I don't know everything.
Here's an example of how to do a banner. I'll be using the banner you see at the bottom of my sig as the example.
Okay, first get all the pictures you'll be wanting to use. At this point you probably will want to have some kind of mental image of what you want your banner to look like. I wanted mine to have a more blue look to it, so I went to my layers section (on my screen that's on my right.
You'll notice that everytime you click a picture the layers area shows all the layers in that particular picture. Right now there should only be one layer (background layer. Right click>New Rastor Layer> In the Blend Mode window that pops up, make it Color (Legacy) instead of Normal> okay.
Now open your fill tool, and go to the foreground box on the right. On the top you should see three tabs, including Gradient. Open Gradient and pick one of the gradients. There are some there that PSP already made for you, but you can always make your own (I can show you how to do that later). Now, with your fill, go to the picture and (on the new Rastor Layer) fill. It should shade the entire picture. You can do that with all the pcitures you want- that makes them easier to blend later on.
I'll add more later, but I need to go now.  _________________ <center>


</center>
|
|
| Top |
|
|
|
|
Post subject: Posted: December 3rd, 2005, 2:28 pm |
|
Joined: 29 November 2005
Posts: 149
|
Thanks....I did all what you put so far...waiting for more...
also I have a question...is there a tool to find the specific color in the pic...like if the pic has a blue but your not sure the blue...is there some tool or way to click on that color and next be using it yourself??? Thanks
I Appreciate you helping very very much....
|
|
| Top |
|
|
|
|
Post subject: Posted: December 3rd, 2005, 4:54 pm |
|
Joined: 13 August 2005
Posts: 2567
Location: Michigan
|
DaBoss wrote: also I have a question...is there a tool to find the specific color in the pic...like if the pic has a blue but your not sure the blue...is there some tool or way to click on that color and next be using it yourself??? Thanks
Here is the way I do that. Use your dropper tool and hold it over the color in the picture. You should see a little window come up that says something like:
R: 81
G: 155
B: 163
Write those numbers down so you remember them. Now you can go to your fill tool and 1. Go to the Color tab and input those numbers into the section that has R, G, and B or 2. Go to the Gradient tab and click edit>new (enter name)>. This brings up a page that lets you move little things on a slider. Click the first one and then click on the Custom button, and input the color numbers like in #1. Click the second slider thing and you can make another color that will blend with the first (white is usually I nice color to use, but it depends).
Okay, on to the second part of making the banner:
I like to work on a large surface so this is how I make one. Click File>New> Width: 1,000, Height: 1,000, Rastor background, Color: Transparent. Then create another one the exact same way and make it 700x150.
In the 700x150 one, fill it with the color you filled your other pictures with. Then right click and copy it merged. Merging it is very important or it will not paste right. Okay, right click in your 1000x1000 area and paste as a new layer. This new layer is your background for the banner. Any part of a picture that is not within that filled area will not be in the final banner. In the layer area there should now be two layers. You will notice if you roll over the layer area, each will show a little picture of what’s in that layer.
Now you will want to paste in all your pictures the exact same way you did the 700x150 layer. Note that before pasting, all the pics need to be the size you want them to be, so resizing before, if necessary.
You are able to move your pictures with the Move tool, so organize yours pictures in the basic area you’ll want them.
Go to the Selection tool> rectangle>replace> feather 30,> anti alias checked> select one of the edges of one of the graphics. You’ll notice that the little running ants now go farther than you originally selected, but don’t worry, that’s what it’s supposed to do. You’ll now hit your Delete key on your keyboard. It should create a faded edge. You can keep deleting until you like how it looks. You do this with all the edges you need to.
During this whole process, you can move and change stuff. Experiment a bit. I realize that’s really basic, but you can do alot more once you get the hang of things.
Once you like how everything looks on the board use your crop tool, and crop out everything but what’s in the filled box. Now your banner is the exact size you need it to be. At this point it’s easier to work with everything if you right click> copy merged> go outside of the project you’re working on and paste as a new image. Now everything you’ve done is merged and one image. It’s a really good idea to save at this point. I usually save as a JPEG file.
This is the part where you add the text and effects you want. There are some cool text tricks you do with layers, but I’ll have to deal with that later.
That’s all for now, again. I went through everything really, really, fast- so if I lost you anywhere, tell me. I’d be surprised if I didn’t… As soon as you’re done with this part I can give some more instructions.
Oh, and just as an FYI, to get rid of the little moving ants you get by using the Select tool, just right click. _________________ <center>
</center>
|
|
| Top |
|
|
|
|
Post subject: Posted: December 4th, 2005, 12:43 am |
|
Joined: 29 November 2005
Posts: 149
|
WOW TY so much for being so great to help me...I have got most of this you have told me...however when i start to do the fading...it worked on one image but not on the others...am i supposed to have a little bit of the edges hanging outside the banner??? Also for another question..when i pasted the 750x150 image in the 1000x1000 background it is really small, Is this how its supposed to be???
One final question...I have got most of your stuff when it comes to telling me where it is...but I am really really green when it comes to this...could you, if you don't mind be a little more specific...Im sorry for asking since you are doing this to help me but I really wanna learn this and it seems you know what you are doing really well...Thanks a BUNCH
p.s. you artwork is great
|
|
| Top |
|
|
|
|
Post subject: Posted: December 4th, 2005, 1:56 pm |
|
Joined: 13 August 2005
Posts: 2567
Location: Michigan
|
DaBoss wrote: however when i start to do the fading...it worked on one image but not on the others...am i supposed to have a little bit of the edges hanging outside the banner??? To fade the edges, you first have to literally click the picture you want to fade with the Move tool, or go to the layers section and click the layer the pictures on. The Select tool will only delete on that particular layer. That makes it kinda nice because you don't have to worry about deleting anything othere than what you want it to. DaBoss wrote: Also for another question..when i pasted the 750x150 image in the 1000x1000 background it is really small, Is this how its supposed to be??? PSP automatically makes your 1,000x 1,000 smaller. If you look at the top of it, to the left of the _ and X buttons, you'll see it says something like 50%. That just means that they've reduced the size on the screen 50%. You can zoom in to 100% and you can see it normal size. DaBoss wrote: One final question...I have got most of your stuff when it comes to telling me where it is...but I am really really green when it comes to this...could you, if you don't mind be a little more specific...Im sorry for asking since you are doing this to help me but I really wanna learn this and it seems you know what you are doing really well..
Sure thing. I'll do my best. I have a little difficulty because each PSP has a slightly different set up. Here's a screenshot of what mine looks like. If you have yours set it up like this, I can be more specific on locations:
 _________________ <center>
</center>
|
|
| Top |
|
|
|
|
Post subject: Posted: December 4th, 2005, 3:05 pm |
|
Joined: 29 November 2005
Posts: 149
|
|
Thank You....all my questions got answered...and yes my PSP screen looks like your exapmle there...Thank you again for everything, I am ready for the next step when ya can....Thanks
_________________ 
|
|
| Top |
|
|
|
|
Post subject: Posted: December 4th, 2005, 3:52 pm |
|
Joined: 13 August 2005
Posts: 2567
Location: Michigan
|
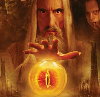
Okay, well now you should have your banner pretty much finished. All you're waiting for is effects. Here's an example of what it should look like at this point (sorry that I couldn't find a better example, since this is one of my earlier works, and the blending wasn't very good):

Now you can use alot of effects here, so I'll try to give you some ideas.
One great thing you can use are brushes. Unfortunatly you'll have to find your own brushes, so I suggest Googling for some. I know that their are also some links for brushes elsewhere in this Tutorial area of AU.
There are some automatic brushes in PSP, if you want to check them out now. Just click the Paint Brush tool. (I think it's the seventh one down on the tool box, for me). In the Tool Options palette, you'll see a dropdown box where you'll see all your brush options. Choose one, move onto your graphic, and it'll show you a little outline of where that brush will go. Just click, and you should see the brush picture.
Just as a note, brushes do not create their own layers, so the image is literally on your graphic. If you want it to be it's own layer, you'll first have to create a new rastor layer (Normal). With brushes, you can change them to any color, gradient, or pattern- which is really nice. You can also make your own brushes to use as well.
For mine, I'm going to use a starry brush I have, with white as my color, and just quickly apply it to my graphic. You'll probably see that it hides some of the problems with my blending.

Edges make banners look nice, so you might want to put one on. An easy way it just to click (on your options area) Effects>3D Effects>Buttonize>Choose what you think looks good. In the picture box you see on the top, the one on the right is a preview box, where you can see what it'll look like.
Another idea (this is the one I've used alot) is to take the selections tool (feather on 0) and create a little outline in the graphic. The line will show where the edge will be. Now go to Selections>Invert. This automatically now creates an outline edge around your graphic. Go to the 10th tool down in the Tool box, and click the one called Lighten/Darken Brush. In the tool options palette, make the size as large as you can. Now go to the graphic you're making and 1. Right click and drag over the graphic or 2. Left click and drag over the graphic. One way will lighten the picture and the other will darken it. This makes a little edge that I think looks pretty cool.:
Hope that's giving you some ideas. You can post what your graphic is looking like so far, so I can give some tips. I'll try to find time to write more of the tutorial later _________________ <center>
</center>
|
|
| Top |
|
|
|
|
Post subject: Posted: December 4th, 2005, 5:46 pm |
|
Joined: 29 November 2005
Posts: 149
|
|
ok im having a few problems, When I do the fade part...it seems to not be working so well...I was wondering how can I just shade the pictures one single color like you did...that would really help the blending. Also with the blending it is hard for me I guess...how do I shade just a little area...when I try and blend it starts blending the character and I don't want that...just the area around him...sorry to ask more questions but it is not looking anything like your banner at all...Thanks for all your help...im sure I will have more questions just can't think of them right now....oh wait...how do I do text on an image and make it where i can color it and fade it so it looks like its not standing out but in the background
<cheers>
_________________
|
|
| Top |
|
|
|
|
Post subject: Posted: December 4th, 2005, 6:01 pm |
|
Joined: 13 August 2005
Posts: 2567
Location: Michigan
|
This tutorial might help with the blending. It's a little advanced and doesn't totally pertain to banners, but I think it might answer some of your questions- and it has picture examples: http://home.comcast.net/%7Eoneextra/blend.htm
If that doesn't anser your questions, I'll can get more specific. _________________ <center>
</center>
|
|
| Top |
|
|
|
|
Post subject: Posted: December 4th, 2005, 6:26 pm |
|
Joined: 29 November 2005
Posts: 149
|
|
Thanks for the tat....anything you can tell me on how to color all my pics one color like the blue in your banner...Thanks
_________________
|
|
| Top |
|
|
|
|
Post subject: Posted: December 4th, 2005, 8:51 pm |
|
Joined: 13 August 2005
Posts: 2567
Location: Michigan
|
|
Actually my blue one does have two colors, but I know it isn't easily apparent because of the way I did it there.
But you can make it look similar by not coloring them before you blend. Instead do it once you have the graphic blended and cropped to banner size. Make it one color by creating a new rastor layer (color legacy) and go to Materials>Color>choose color>Okay. Fill the rastor layer and that should do it.
Another note that I just thought of is that you can move the order of the layers on your palette. Sometimes that can help with blending, because one picture looks better in front of another picture as apposed to below. You can move a layer's order by right clicking on the layer in the Layer Pallete>Arange> (click the move you want: bring to top, move up, down, ect.)
_________________ <center>
</center>
|
|
| Top |
|
|
|
|
Post subject: Posted: December 4th, 2005, 9:51 pm |
|
Joined: 29 November 2005
Posts: 149
|
|
ok Thanks...I am getting the hang of it a little now...if you will keep going I will keep listening...
Thanks
_________________
|
|
| Top |
|
|
|
|
Post subject: Posted: December 4th, 2005, 9:56 pm |
|
Joined: 13 August 2005
Posts: 2567
Location: Michigan
|
|
okay, well, how 'bout you show me what you're doing so far, that way I can kind of get an idea of what direction I should go.
_________________ <center>
</center>
|
|
| Top |
|
|
|
|
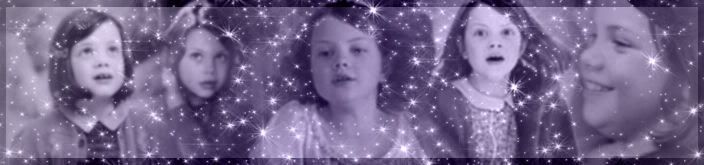
Post subject: Posted: December 5th, 2005, 12:10 am |
|
Joined: 29 November 2005
Posts: 149
|
|
| Top |
|
|
|
|
Post subject: Posted: December 5th, 2005, 7:50 pm |
|
Joined: 13 August 2005
Posts: 2567
Location: Michigan
|
|
hey, that's pretty good. You did a good job with the blending.
Is there anything specific you'd like to know how to do with PSP?
_________________ <center>
</center>
|
|
| Top |
|
|
Who is online |
Users browsing this forum: No registered users and 19 guests |
|
You cannot post new topics in this forum
You cannot reply to topics in this forum
You cannot edit your posts in this forum
You cannot delete your posts in this forum
You cannot post attachments in this forum
|
Powered by phpBB © 2000, 2002, 2005, 2007 phpBB Group
Boyz theme by Zarron Media 2003
|
|


