I just wrote a colorization tutorial for my site, and I figured I'd post it here to share with you as well!
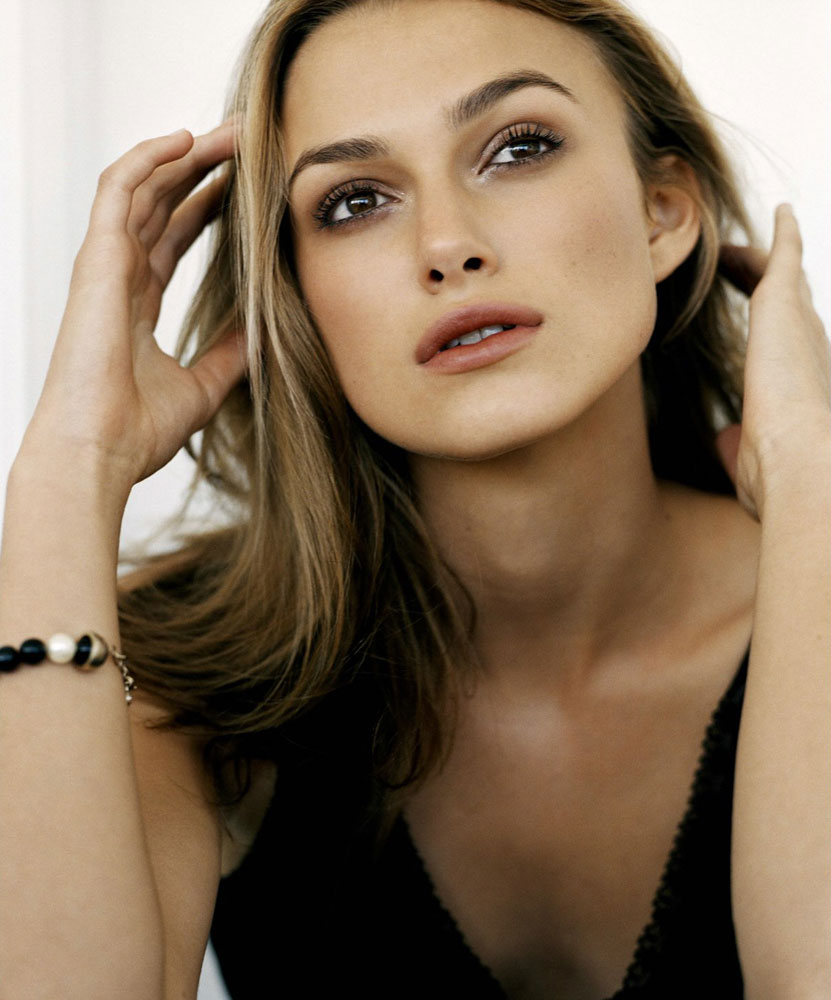
1. First, open up your image in Photoshop. I'm using
this image from SweetandTalented.com. Resize if you would like. I made mine 499x600.
2. Now sharpen your image once (filter > sharpen > sharpen).
3. Duplicate your image layer and desaturate it completely (Ctrl + Shift + U).
4. Create a new layer and set the layer mode to "color".
5. Pick a medium size, round, soft brush. Mine is one of the default brushes (65px master diameter, 0% hardness, 100% opacity, 60% flow). Pick a foreground color for the skin, a dark brown is what I use. For this I'm using #352b1d but just play around with colors until you find what works best.
6. Now use your brush on the new layer that you created in step 4, covering all the skin areas. Don't worry if it doesn't look quite right, because we'll fix that later.
7. Now use the eraser tool to erase any parts of your 'skin' coloring layer that overlap onto hair, clothing or background. Don't worry about being perfect, though, because most of the time it's not very noticeable.
8. Next, duplicate the skin layer and set it to "soft light". We need to change the Hue/Saturation (Ctrl + U). I set my Hue to -13, Saturation to +83, and Lightness to +61. Play around with whatever looks the best.
9. Now it is time for the hair. Create another new layer and set it to "soft light".
10. Using the same brush as in step 6-7, pick a new foreground color for the hair. Keira has brown hair, so I'll be using a brown color (#432b17), but you'll need to decide which color is best for your subject.
11. Use the brush tool to color the hair on your new layer. Erase any bits that overlap other parts of the picture.
12. We're going to change the saturation again (Ctrl + U). I put the saturation at +35.
13. Create a new layer for the lips. Set to "soft light". This time use a smaller brush, still round, maybe about 13 px and 50% hardness. Choose a red/pink color for the lips (I'm using #8f4859). Color in the lips, but be very careful not to color any of the skin on her face, or it will look like your model/celeb couldn't put on her make-up correctly

14. Now for the eyes. Again, create a new layer and set to "color". Use a small, soft round brush to color the eyes with whatever color you'd like. I used #667491. Then set the opacity of the layer to 50%. (otherwise your person will look like some very strange alien O_O)
15. We're getting closer to the finish! If you have any clothes or jewlery you want to color, do it in the same way as you did for the skin, hair, lips, and eyes. I don't want to color anything else, so I'm moving on.
16. Stamp all your layers into one layer on top of the entire piece. (Ctrl + Alt + Shift + E) Set this new layer to "soft light" and sharpen the layer once.
17. Now you could stop there, but I like to add a little more color and sharpness to my piece. I duplicated the layer we made in step 16 and desaturated it a little bit (Ctrl + U > set the saturation to -26).
18. My last step is to add some text, brushes, and a border. This is all really just up to you. I used the font LainieDaySH and a brush from Rythmique.
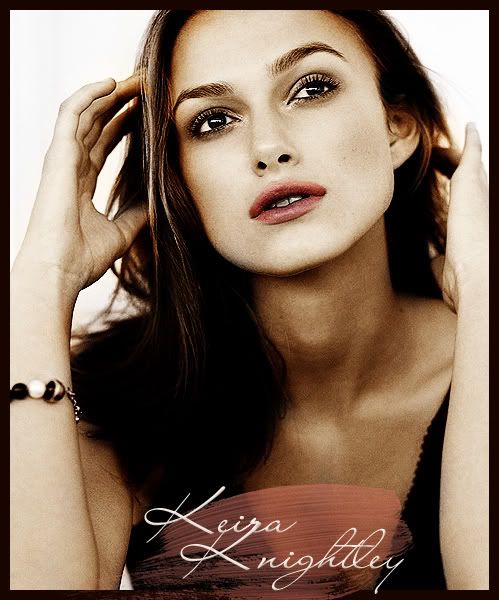
see the final productAnd that's it! Feel free to email me if you have any questions


")


")


")

