|
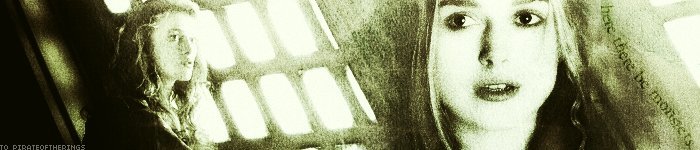
This section will teach you how to create certain effects for your graphics The Streaming Light Effect
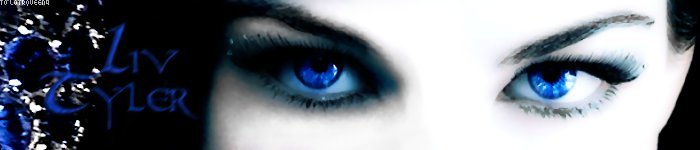
Example: First, make your whole banner in PSP (Paint Shop Pro). If you use layers, merge all of them. Then copy your banner and paste it as a totally new image so that you have two identical banners. Take one banner, and going to Effects > > Blur, choose Motion blur. Set your blur angle (I usually choose 45 or 315), and set the intensity to 40. Click ok. Now take this blurred image, copy it, and paste it into the unblurred image (Ctrl + E). Move it until it's exactly on top of the unblurred image. Promote the blurred image to a layer, and then go to the eraser tool. Set the opacity to 50, the size to 255, the step to 25, the density to 100, and the hardness to 0. Hold down the mouse and "erase" all of the banner--this won't actually erase it, but it will fade the blurred part of the image 50%. Tada! You now have a streaming light effect, and all that remains to do is merge the layers and save your banner. Note: thanks to Frodo Baggins for first giving me the idea for this effect, even though I didn't end up using his method.
Example: First off, as always, open up the image you want to work with. If you want faded text, use the following instructions; if you're looking to fade an image, skim ahead a couple sentences. For text: click on the text tool (on the left menu with an A on it), enter your font color, face, size, etc. (and of course your words), make sure the Floating and Antialias boxes are checked, and click ok. Position the text where you want it. For an image, open up the image that will go over the current image. Copy and paste it onto the base by hitting Ctrl + C, then clicking on the base image and hitting Ctrl + E. Move the image around until it's properly positions and click once more to hold it down. Now, with your text or image, properly placed, click on Selections > > Promote To Layer (at this stage, if you want to move your image/text to another spot, click on the Mover button, which is right below the Crop icon). Now click on the eraser, which is four icons above the text tool. Press O to bring up Options. Set the size to something like 20 to begin with, the density to 100, the step to 25, and the hardness to 0. Make sure "Build up" is unchecked. Here's the important part: decide how much you want your text/image faded. 50%? 15%? 95%? Whatever it is, set that number in the Opacity box. Now hold your cursor over the image/text, hold the mouse down, and move the cursor back and forth until all of the text/image is faded. Don't let the mouse up until you've covered all of the image/text. Tada! You're done :)
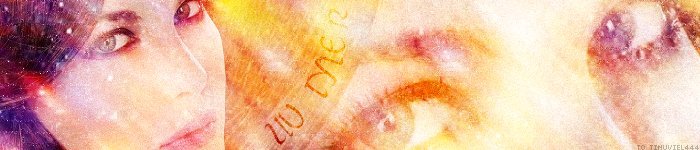
Example: For this effect, you'll need a program with the Diffuse Glow effect (Photo Impact Pro and PhotoShop both include it). If you have Paint Shop Pro, go on to the alternate glowing effect tutorial below. First, complete your graphic, but make it a little darker and less contrasted than you usually would. Then go to the diffuse glow effect (in Photo Impact, this can be accessed by going to Effect > > Photographic > > Diffuse Glow). White is the best color for the glow; other colors oddly distort the image. A good threshold setting is 12, while anywhere between 3 and 10 is a good setting for the degree of glow. Lastly, the graininess is best set at 0. Click ok, and tada! There you have it.
Example: First, complete your graphic, and make it a little darker and less contrasted than you usually would. Then hit Ctrl + C to copy it, and Ctrl + V to paste it as a new image, so that you have duplicate graphics. Take one graphic, and under the Blur menu, select Blur or Blur More (either works well). Now copy this blurred graphic on top of the unblurred one. Hit Ctrl + P to promote it to a layer. Go to the eraser tool on the left side of your screen (four buttons up from the A), and hit O to bring up the options panel. Set the size to 255, hardness to 0, opacity to 50, step to 25, and density to 100 (the shape should be round). Hold your cursor over the image and press it down, erasing (half-erasing, actually) the image. Then go to the Blur menu again and select Blur. Tada! There's your alternate glow. All you have to do is merge the layers by going to Layers > > Merge > > Merge All, and save your graphic.
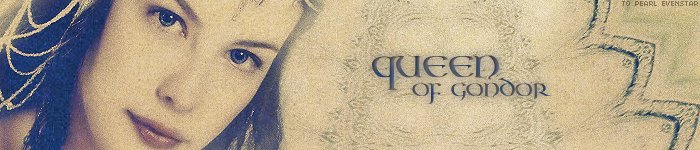
Example: In Paint Shop Pro, complete your main graphic, and then go to your text tool (the A button on the left side of your screen). Click anywhere on the image, and when the text window pops up, choose your font face, size, alignment, and color. The color should be solid, and there shouldn't be any Stroke. Make sure to have the Floating and Antialias boxes checked. Then click ok (if the moving dotted marquee border bothers you, hit Ctrl + Shift + M to make it disappear). If you have PSP 7, go to Effects > > Plug-in Filters > > Eye Candy 3.1 > > Glow. Set your glow width, opacity, and color, click the check mark to apply the effect, and you're done. In other versions of PSP (or if you want a softer glow), go to Effects > > 3-D Effects > > Drop Shadow. Set both offset boxes to 0, the opacity to about 80, and the blur to about 10. Select your color, and click ok. In most cases, this glow will be too faint to make much of a difference, so hit Ctrl + Y a couple times to repeat the effect. Enjoy!
Example: Open up your image or solid base, and set down some text (in Floating format, with Antialias checked). Choose a color a little darker than you want your final text to be. Promote the text to a layer (Shift + Ctrl + P). If you want an effect such as an inner bevel, apply it now. Duplicate the text layer (Layers > Duplicate). With the duplicate selected, go to Layers > Properties and set the blend mode to Screen. Go to Effects > Blur > Gaussian Blur, and set the radius to 5.00. Tada! If you're happy with the result, you're good to go; if not, you can increase the effect by duplicating the Screen layer, or decrease the effect by lowering the opacity of the Screen layer in the layer properties box. Enjoy!
Example: Open your nearly-complete image in your favorite image editor (all layers should be merged), and duplicate it (Layers > Duplicate). With the duplicate selected, go to Effects > Blur > Gaussian Blur, and set the radius to 5.00. Now go to Layers > Properties, and set the blend mode to Overlay (strong effect), Soft Light (a little less strong), or Screen (very light, like the example banner). Merge the layers, and you're done!
Example: For this effect, it's best to have a picture with a closeup on the eyes. Open up a picture like that, and (if you want) make it black and white or decrease the saturation so that the eyes will stand out even more. Using the retouch tool (the little white hand in PSP), set your drop-down menu to Color to Target. Choose the color of the eye by selecting a foreground color (in PSP, the left-hand color swatch on the right side of your screen). Something a little darker than you want the complete eye to be and a little duller works well. Set the size of the brush to anything 15 pixels or more, depending on the size of the eye. Hardness should be 0, Opacity 15, Step 25, and Density 100. Zoom in on the eye and color the areas outside the pupil. Change your retouch tool to the dodge setting, but keep all other settings the same. Draw (lightly!) around the areas you colored. Repeat until you have the look you want. This usually causes the pupil to shrink and look odd, so change the retouch tool to Burn (all other settings can stay the same), and "burn" the edges of the pupil to widen it. If you're satisfied, save and you're done, but if the eye looks a little jagged and too prominent, change the retouch tool to Soften and use it to cut down on ragged edges of the eye.
Example: (Tutorial is for PSP 7, but it may work with other versions/programs.) Open your base image. Go to the Draw setting, and select Freehand line, with any width you want. Check the Antialias and Create as vector boxes. Draw the line as the path you want your text to follow. When you've finished, select your text tool, and hold your cursor over the line so that you see an A with a semicircle under it. Type in your text, hit enter, and promote it to a layer. Under your Layers menu, click on Layer 2 (the line) to select it, and then go to Layers > Delete. Tada! You have curved text. Notes: 1) The text will always follow the direction in which you drew your line (if you drew it from left to right, the text will start on the left side. If you want the text on the opposite side of the line, draw the line in the opposite direction, and your text will appear on the opposite side of the line. 2) You can also make curved text using a preset shape - just make sure the Vector box is checked!
Example: It's hard to describe what's meant by "colored shadows," but the gist of it is that the darker areas are filled with a color other than black or a dark gray/brown, and that the lighter areas have the opposite color. There are several ways to accomplish this effect, but here's a simple one. For a sample image, use this one. Copy it into your image-editing software. Now copy this texture on top of the image and promote it to a layer. Turn the texture into a negative (Colors >> Negative Image in PSP7). Go to Layers >> Properties and set the blend mode to Exclusion. Go to your Gamma Correction menu (Shift + G), and darken the texture (0.56 in this example). Now adjust the colors (Colors >> Adjust >> Color Balance). You can use any combination, of course, but in this example, I've set the first box to -58, the second to -51, and the third to 30 (in general, sliding down the red and green levels and sliding up the blue level works best). Repeat this step for a more pronounced effect. And tada, here's our final product!
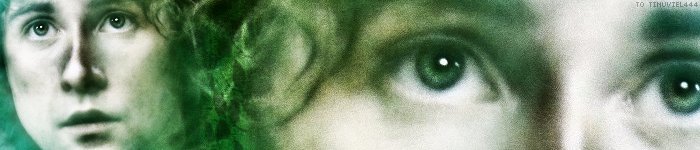
Example: Despite the odd-sounding name, this effect can be a nice addition to your graphics. It will enhance the shadows of your image and in some cases, give it a soft waxy look. Let's start with this image. Copy it into your program and duplicate the layer (Layers >> Duplicate). Since this image is medium-dark already, set the blend mode (Layers >> Properties) to Screen (if your image is lighter, set it to Soft Light!). Now make sure your foreground color (in PSP, toward the top-right corner of your screen, the color swatch on the left that says Foreground Solid Color when you hold your mouse over it) is set to white. Go to Effects >> Artistic Effects >> Hot Wax Coating (don't panic, it will look a little weird at first). If your image was light (like our example) repeat the effect (Ctrl + Y). Go to Effects again, this time to Blur >> Gaussian Blur. Try setting it to 3.00 at first. If that still looks strange, set it to 5.00. If that still looks weird, go back a few steps and take out the repeated Hot Wax Coating. Your final image will look something like this. Congrats!
Example: For this tutorial, you will need the free Virtual Photographer plugin installed. Let's use this image for a sample. Open it in your software and go to the Virtual Photographer plugin. Choose the Sixties Slide preset, but set the box currently set to Magenta to Green. Drag the slider beneath it to the left until it reads 15. Process it. Open VP again and do the same thing, except set the color to Yellow (remember to slide it to 15 again). Do the same thing, except with orange (set to 15). Do it again, but set it to blue, and this time set the number to 6. Finally set it back to green, but set the slider all the way to the left at 0. Done! Your finished graphic would look like this. |