|
This banner tutorial is primarily for Paint Shop Pro users. It was originally written as a "Process Analysis" essay for an English class, so that explains the sometimes overly-flowery writing ;) The internet banner is omnipresent. There are the advertising banners, continuously bellowing offers and warnings at visitors. There are the linking banners, which all demand the same favor from the viewer: click and visit the site that this banner announces. Then there are the art banners. These beautiful, elongated images use a full sixteen-million-color palette, allowing sparkling hues and rich shades to be used. Because of their size, which sometimes spans entire page widths, many amazingly subtle details can be woven into the banners. It is these graphics that are worth learning how to create; these graphics will attract the attention of countless viewers. To start, you’ll need a copy of the image editing software Paint Shop Pro 7. Later or earlier versions will also suffice, although there are several minor disparities between version seven and the others. Other popular image editing programs such as PhotoShop and Fireworks are slightly similar, but contain far too many differences to be used for this tutorial.
Open up your version of PSP (Paint Shop Pro). A blank screen lies in wait, eagerly anticipating your masterpiece. Click on the icon of a white piece of paper, which is directly below the File menu. This is the “New Image” button, which will bring up the options screen. Under the heading “Image Dimensions,” you’ll see two boxes: width and height. Type in 700 under width and 150 under height, making sure that the box to the right is set to pixels (not inches or centimeters). This is hardly a universally accepted banner size, but 700 pixels is wide enough to span about two thirds of an average screen while not being too long or too short; 150 pixels is tall enough to not make the banner too skinny while not making it stumpy, either. The resolution of the image should be at 72.000 (this setting will make a high-quality image without taking up much disk space), while the drop-down menu to the right of resolution should be set at pixels/inch. The second heading, “Image Characteristics,” is much simpler. Your only task is to select the image’s background color (any color is acceptable, as this is just the base and will not be visible in the final banner) and 16.7 million colors for the image type. Click OK, and you’ve just completed the first step in making a banner!
The "New Image" screen Now comes the fun, creative part. Your job is to choose the images you will transform (or mutilate). The guidelines are simple: the first image should be somewhat simple, sharp, and at least 700 pixels wide and 150 pixels tall; the second image is the subject of your banner: it should be sharp and at least 300 pixels by 300 pixels, while also having a clear-cut outline. (To find out the size of a web image, right- click on it, select properties, and look at the dimensions.) Other than these simple credentials, the pictures you use can be from any source, with any colors and subject matter. However, to simplify this example (or merely to help people whose creative brain cells have suddenly gone on vacation), it is recommended that you use the image at http://www.framecaplib.com/lotrlib/html/episodes/images/ttt/ttt0495.htm for image number one and the image at http://www.framecaplib.com/lotrlib/html/episodes/images/ttt/ttt0489.htm for image number two. To place them in PSP, right-click on image one, select copy, go back to PSP, and hold down the Ctrl and V keys at the same time to paste. Repeat this process for image two. Your PSP screen now contains a long rectangle (your banner’s base), a large photo of the city of Edoras from The Lord of the Rings (your banner’s background), and a large photo of the character Eowyn from The Lord of the Rings (your banner’s subject). Select the Eowyn image and click on the Image menu (three menus to the right of File). Click Mirror, which will flip the image—in the end, this will complement and balance the Edoras picture better. Although the photo is a beautiful shot, it lacks color compared to the Edoras image; this must be remedied. To do so, hold down the Shift and B keys at the same time, bringing up the Brightness/Contrast panel. Click the magnifying glass on the left to zoom out a bit. Set the Brightness to 0 and the Contrast to 30 by punching in these numbers in their respective boxes. Then click OK, and compare your background and foreground images. Do they complement each other? Do they appear to fit well together? If not, select the image that seems less colorful and toggle the Brightness/Contrast until it corresponds better.
The Eowyn image without a contrast adjustment (top) and with a contrast adjustment (bottom). Note: images are not shown at full size. The images are now ready to be combined. First, the size must be fixed. Select the Edoras photo and hold down the Shift and S keys, bringing up the size menu. With pixel size selected, type in 750 under width. Make sure that at the bottom of this menu, the resize type is set to bilinear resample (the best resize method for shrinking images), and the two check boxes below are checked (with the “maintain aspect ratio” box checked, the height will automatically change to correspond to the specified width). Click OK, and then with the image still selected, hold down the Ctrl and C keys. Now select the banner base and hold down Ctrl and E. This pastes Edoras into the base, and allows you to change the position of Edoras by moving the mouse. Move the image until none of the base shows, but so the actual city is almost centered vertically. Click once, and the image locks into place.
The resize panel
Although the background is now finished, the foreground of your banner remains incomplete. Select the Eowyn image again and click on the freehand selection tool. This tool is accessed by clicking on the yellow lasso icon on the left of your screen; it’s six icons down from the white arrow at the top. Press the O key to force a perky little options panel to pop up. Make sure the antialias box is checked (this will eliminate jagged edges), and set feather to 20 (this will produce a soft, “feathery” edge). Go to the Eowyn image, and starting at the top left-hand side of her face, hold down the mouse and trace around Eowyn’s face, hair and all. Once you reach your starting point, let go of the mouse, and a moving, dotted marquee will spring up, a little outside the line you traced. Hold down Ctrl and C, then let go and press Ctrl and V.
The perky little options panel
You now have Eowyn’s face in a separate image— but it’s much too large to fit in the banner, unless all you want is a close-up on the eyes. To handle this, bring up the ever-useful size menu again by pressing Shift and S. The size that you use is subjective; there are no “right” dimensions. For this example, set the width to 300 (the height will automatically change). Click OK, and as soon as the image shrinks, hold down Ctrl and C. Go back to your banner base and hold down Ctrl and E. Tada! Eowyn appears in the banner. Move the image around until Eowyn is positioned on the left side of the banner. For best results, move her to the left until the left edge of her hair that you traced is not visible. Right-click on this new foreground to lock it in place, and your banner is very possibly complete. If you wish, you can add more images using the same basic steps as you used for the Eowyn image. You can also add text by clicking on the icon on the left side of your screen with the A on it. After selecting this text tool, click anywhere on your banner for the text panel to spring up. Type in your words, select your font, size, and fill color, select Floating and Antialias under “create as,” and click ok. You can move the text around by clicking on it and dragging it. When you’re satisfied, right-click to lock it. If you’re finished, or if you were finished a while back, the only step left is saving your work. To do so, press the F12 key, select JPEG - JFIF compliant under “save as type,” enter your banner’s name, and click save. Congratulations! Your banner is now complete, and you have honed your banner-creating skills so that you can fashion beautiful images easily. You can upload your finished banner to the internet and display it on a web site or forum, show it to friends and family, or simply save it in a remote folder as a souvenir of way back when you were just beginning to enter the wonderful world of the internet banner.
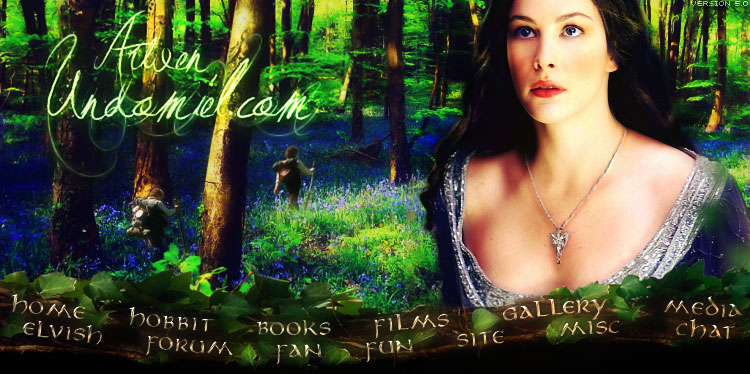
What your final banner should look like (without additional images or text). Note: image IS shown at full size. |