| Author |
Message |
|
|
Post subject: Adobe Photoshop Tutorials  Posted: Posted: November 4th, 2005, 6:56 pm |
|
Joined: 07 June 2005
Posts: 2370
Location: England, normally in my room

|
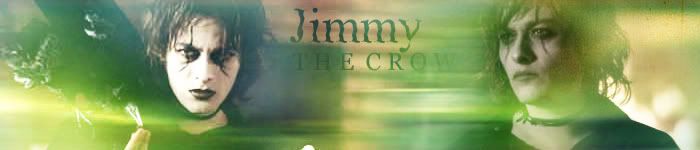
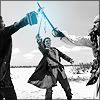
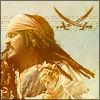
[b]Banner Tutorial 001.[/b]
<font size=1>Images courtesy of Google Image Search</font>
I'm going to go from this:


to this:
1. I open up the images I need in Photoshop--in this case, the two images above of Jimmy from The Crow: Wicked Prayer.
2. I create a new blank image (Ctrl+N), and set the width to 700px and the height to 150px. Click ok.
3. Using the 'Fill Bucket' tool (located on the left panel, looks like a tipped paint bucket), I fill the blank canvas with black.
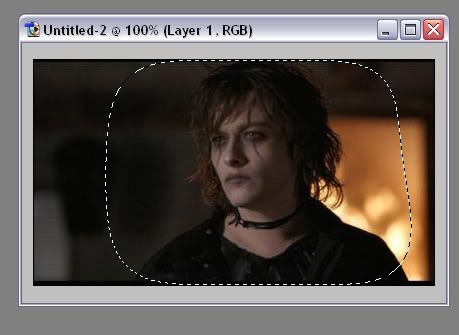
4. I get one of my images--doesn't matter which one--and select the 'Marquee' tool (located to the left, looks like a lasso rope)
5. At the top of the screen, with the marquee selected, you'll see a box that says 'Feather:' and a box with a number in it. Change this number to ' 30px'.
6. Select around the part of the image you want on the banner--in this case, Jimmy's head and shoulders--make sure to leave quite a bit of room around the object, like this:
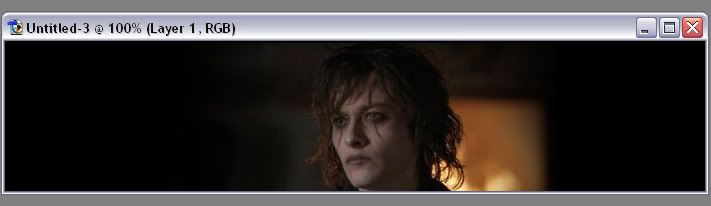
7. I then press Ctrl+C, to copy the selection, and go back to my black canvas and press Ctrl+V, to paste it, so it looks like this:
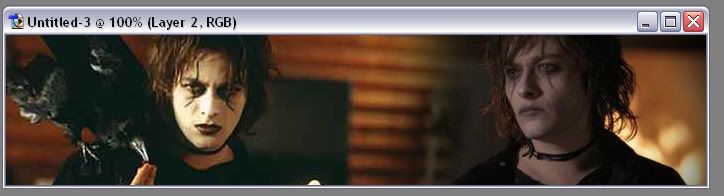
8. Obviously the picture is not where I want it, so I select the 'Move' tool (located on the left, looks like a black arrow with a cross to the right of it) and move it to the correct position.
9. Repeat steps 4-8 for the rest of your images. I now have something like this:
10. What I want to do is to add some effects and colours now. Go to Layer>>Flatten Image.
11. Go to Layer>>Duplicate Layer... and click OK. You don't have to change anything in the box.
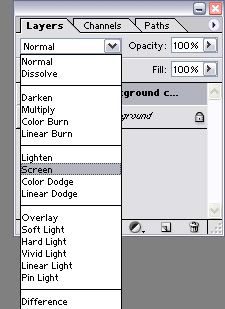
12. On your layers palette, make sure your duplicated layer is selected and go to the little box that says 'Normal'. Select 'Screen', like this:
13. Now press Ctrl+U. Lower the Saturation to –60, click OK.
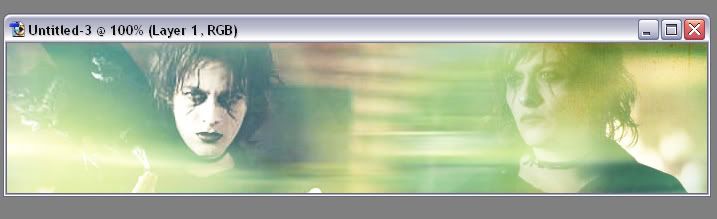
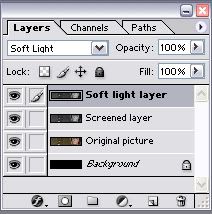
14. Go to Layer>>Duplicate Layer... again. Then go to your box on the Layers palette, make sure the top layer is selected, and set it to 'Soft Light'. So you should now have one 'Normal' layer, one 'Screen' layer, and one 'Soft Light' layer.
15. Press Shift+Ctrl+U on the ‘Soft Light’ layer. This desaturates the image.
16. Now what I need is a texture--I'm going to use this one from the talented TRE.
17. Select your texture and copy it. Then go back to your banner and press Ctrl+V. This will now completely cover your image.
18. On the layers palette, set the texture to 'Screen'. It now looks like this:
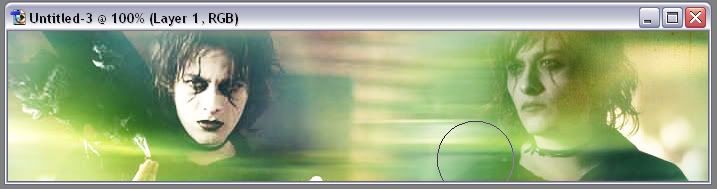
19. Pick up the 'Burn' tool (looks like a hand making a circle) and gently pick out the bits of the image you want to see more clearly, like the face and the hair--like this:
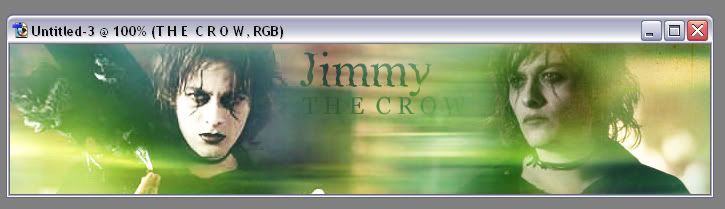
20. To add text, select the 'Text' tool (looks like a 'T' in a box) and write your text in. Use the 'Move' tool to position it in the right place. Here's what mine looks like:

(Using the font Zanes for ‘Jimmy’ and Georgia for ‘T H E C R O W’)
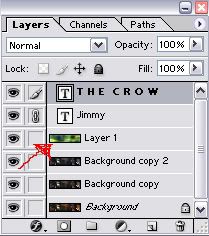
21. On the layers palette, grab your texture layer, and move it so it is above your text layer(s), like this:
 to this: 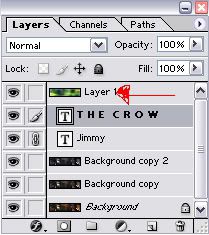
22. The text should look like this:
23. And you're done! You can add more brushes and such to it, of course, but that's the basics.
Hope this helps people, and if you're not sure--ask me! 
_________________ <center>
Last edited by Ororuthiel on February 17th, 2006, 11:38 am, edited 3 times in total.
|
|
| Top |
|
 |
|
|
Post subject: Posted: November 18th, 2005, 9:40 am |
|
Joined: 30 September 2005
Posts: 182
Location: Moscow, Russia
|
Thanks, Oro!  Quite a few things I wasn't even aware of 
I have questions.  I'm doing wallpapers for my theatre here and there are a couple of problems.
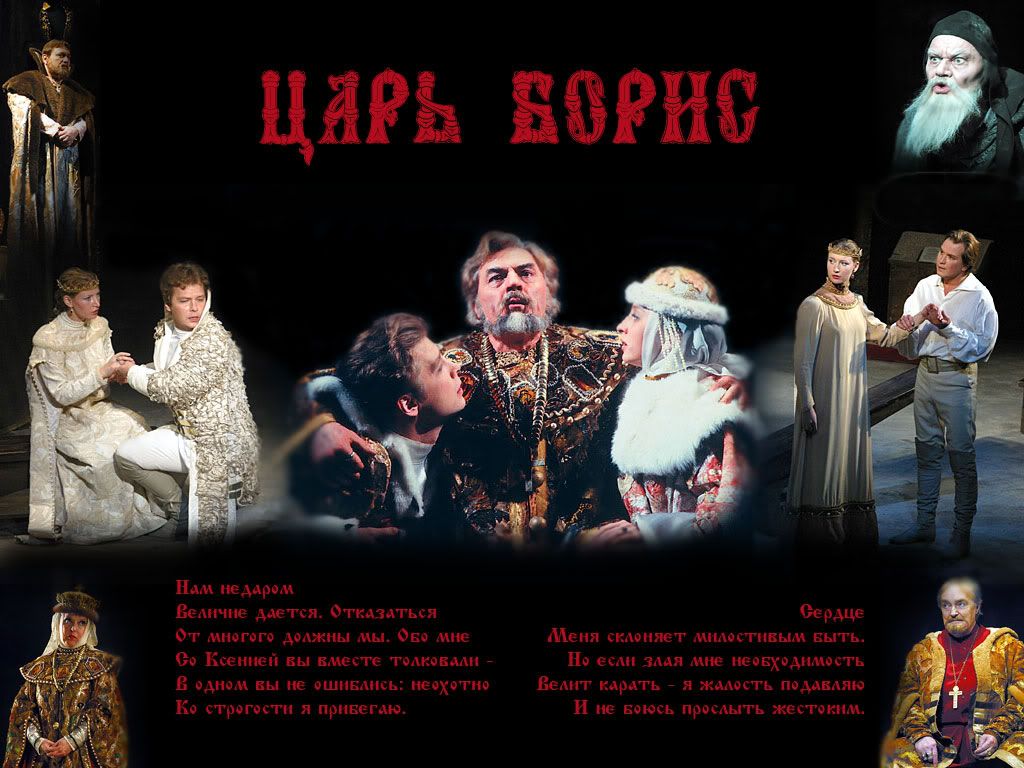
One, since all the photos were taken onstage the background is very dark. I can't keep making black-background wps or cutting out - any suggestions?
Another thing, is something I've been struggling with for some time. Can't find the answer. How do I blend images? (Not sure about terminology here.) That is, how do I make one image gradually flow into another? Someone recommended gradient on a layer mask but that's not working for image to solid color, for example. (And anyway not the result I'm hoping for...)
I'm using Photoshop CS 2, if you're wondering.
EDIT:
http://img.photobucket.com/albums/v669/Springie/Boris.jpg - see what I mean about dark and blending? Any suggestions as to what I should do from here?
|
|
| Top |
|
|
|
|
Post subject: Posted: November 25th, 2005, 6:32 am |
|
Joined: 07 June 2005
Posts: 2370
Location: England, normally in my room
|
^ You could try setting the feather when your selecting the image to blend to 30px, but otherwise, that's about my knowledge of CS 2  sorry I can't be much more help!
LOTRfreak13 requested another banner tutorial to be put up, which will be appearing soon. _________________ <center>
|
|
| Top |
|
|
|
|
Post subject: Posted: November 25th, 2005, 7:32 am |
|
Joined: 07 June 2005
Posts: 2370
Location: England, normally in my room
|
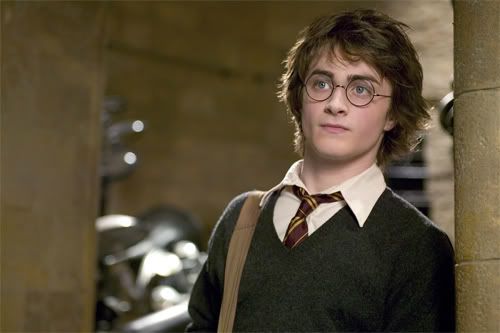
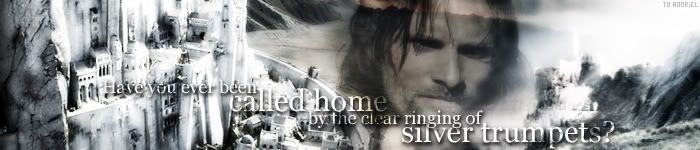
Banner Tutorial 002.
<font size=1>Image courtesy of [url=http://veritaserum.com[/url]Veritaserum[/url]</font>
1. I open the image[s] I need in Photoshop--in this case, the rather lovely picture of Daniel Radcliffe in Harry Potter and the Goblet of Fire:
2. I create a new blank image (Ctrl+N), and set the width to 700px and the height to 150px. Click ok.
3. Using the 'Fill Bucket' tool (located on the left panel, looks like a tipped paint bucket), I fill the blank canvas with black.
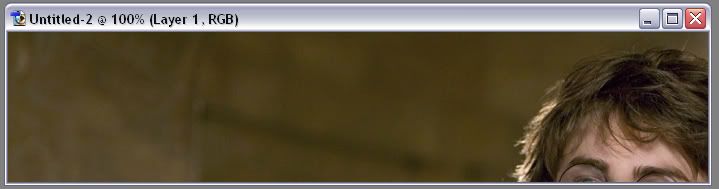
4. I go to my picture of Harry and go to Image>Image Size. I enter in my numbers for resizing, making sure that the 'Constrain Proportions' box is ticked [This prevents the image from becoming skewy]. Click ok.
5. On my Harry image, I press Ctrl+A, and then Ctrl+C. This selects all of the image, and copies it.
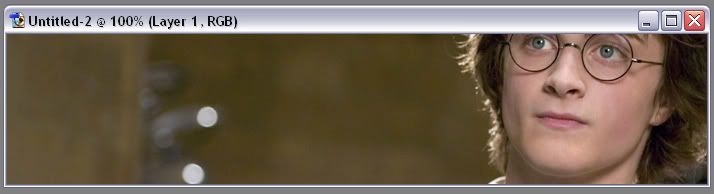
6. I go to my black canvas and press Ctrl+V. The image should now be on your banner, something like this:
7. Obviously the picture is not where I want it, so I select the 'Move' tool (located on the left, looks like a black arrow with a cross to the right of it) and move it to the correct position, so it looks like this:
8. What I want to do is to add some effects and colours now. Go to Layer>>Flatten Image.
9. Go to Layer>>Duplicate Layer and click OK. You don't have to change anything in the box.
10. On your layers palette, make sure your duplicated layer is selected and go to the little box that says 'Normal'. Select 'Screen', like this:
11. Click Shift+Ctrl+U. This desaturates the image.
12. Now [making sure that the 'Screen'ed layer is still selected], go to Layer>Duplicate Layer again. This time, set the blending mode to 'Soft Light'. My image now looks like this:
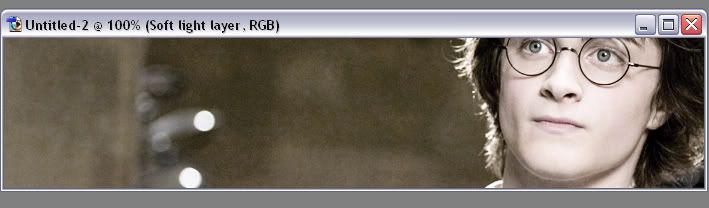
14. With your 'soft light' layer still selected, go to Filter>Blur>Gaussian Blur. Set the 'radius' to 3.0 and click OK. Do the same with your 'screen' layer.
15. Now what I need is a texture--I'm going to use this one from the talented TRE.
16. On your texture, press CtrL+A and Ctrl+C, then go bak to your banner and press Ctrl+V. The texture layer should now completely cover your banner.
17. On the layers palette, make sure the texture layer is selected and set the blending mode to 'Multiply'.
18. If the texture you have chosen it too 'grainy' for your liking, go to Filter>Blur>Gaussian Blur to make it a bit softer. It should now look like this:

19. To add text, select the 'Text' tool (looks like a 'T' in a box) and write your text in. Use the 'Move' tool to position it in the right place. Here's what mine looks like:
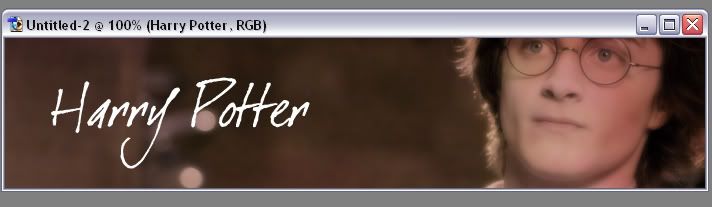
20. Now go to your Layers palette and click on the text layer [mine is called 'Harry Potter']. Drag the layer so it goes underneath the 'Texture layer', like this:
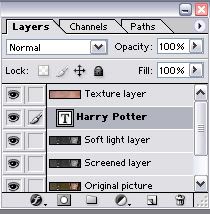
21. Now set the text layer blending mode to 'Overlay', and go to Layer>Flatten Image.
22. You can leave the banner like this if you want, but here's another little effect you can do.
23. Create a new image [File>New, or Ctrl+N], making the width 700px and the height 150px--in other words, the same size as your banner. If your banner is a different size, make the new image those sizes.
24. If the blank canvas isn't black already, use the 'Fill Bucket' tool to do so. Then go to Layer>Duplicate Layer.
25. Fill this duplicated layer with white colour. It should now appear to be a completely white canvas.
26. Go to Edit>Transform>Rotate. Use the little markers on the corner of the image to rotate the white canvas to an angle, like this:
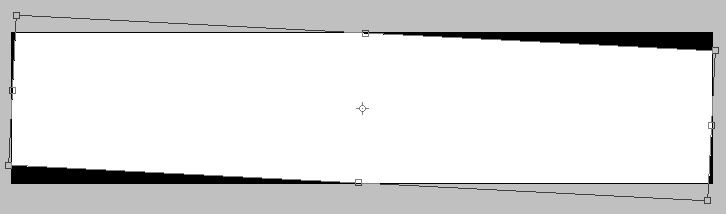
27. Click on any of the little icons to your left--it doesn't matter which one. It should come up with a pop-up box saying if you want the layer effect to be applied--click 'Apply'.
28. Now to to Layer>Flatten Image, and press Ctrl+A and Ctrl+C. Then go to your banner and press Ctrl+V.
29. Set this black and white canvas to 'Overlay'. My banner now looks like this:
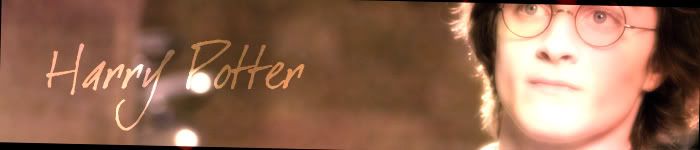
30. If this is too bright for you, you can press Ctrl+I to make it inverted. It depends on how dark your original banner is.
Et voilá, you're done! You can add brushes and other such effects, of course, but that's entirely up to you. If you have any questions or anything, don't hesitate to ask
_________________ <center>
Last edited by Ororuthiel on February 19th, 2006, 1:46 pm, edited 3 times in total.
|
|
| Top |
|
|
|
|
Post subject: Posted: November 25th, 2005, 7:41 pm |
|
Joined: 04 June 2005
Posts: 2071
Location: Lothlorien
|
here mine

But oro i was wondering how you got that banner to look like this
what are the color schemes and such? its like all glowing and stuff like that _________________ <center>
www.silent-knight.net

Yo ho, haul together, hoist the colors high... Heave ho, thieves and beggars, never say we die
</center>
|
|
| Top |
|
|
|
|
Post subject: Posted: November 26th, 2005, 8:09 am |
|
Joined: 07 June 2005
Posts: 2370
Location: England, normally in my room
|
|
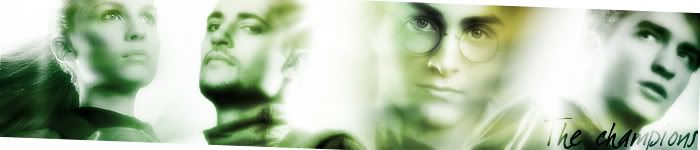
^ Yeah, that depends on what texture you use. The glowing effect is the blur... I did exactly the same things with the Harry banner and the Champions banner, it depends on the pictures you're using.
_________________ <center>
|
|
| Top |
|
|
|
|
Post subject: Posted: November 27th, 2005, 5:16 pm |
|
Joined: 28 June 2005
Posts: 2310
Location: USA
|
Ok sorry...another stupid question...how do you get pics of what appears on your computer screen and things like that, like to make a tutorial? 
_________________
<center>
<a href="http://raindrops.lemon-drop.net/">Between the Rain Drops</a>
[ + @ # ? : ]
|
|
| Top |
|
|
|
|
Post subject: Posted: November 28th, 2005, 4:34 am |
|
Joined: 30 September 2005
Posts: 182
Location: Moscow, Russia
|
You Print Screen them, Keyo
There's a key on your keyboard (where you have NumLock, Scroll Lock and the like), that says Prt Sc.
What it does basically is this: you open whatever it is you want to make a pic of, press Prt Sc, go to Paint (not PSP but the good old ordinary Paint program), choose Edit=>Paste.
So the Prt Sc key just copies whatever is on your screen at that moment.
|
|
| Top |
|
|
|
|
Post subject: Posted: November 28th, 2005, 7:01 pm |
|
Joined: 28 June 2005
Posts: 2310
Location: USA
|
Springie wrote: You Print Screen them, Keyo There's a key on your keyboard (where you have NumLock, Scroll Lock and the like), that says Prt Sc. What it does basically is this: you open whatever it is you want to make a pic of, press Prt Sc, go to Paint (not PSP but the good old ordinary Paint program), choose Edit=>Paste. So the Prt Sc key just copies whatever is on your screen at that moment. oo kool! Thanks!
_________________
<center>
<a href="http://raindrops.lemon-drop.net/">Between the Rain Drops</a>
[ + @ # ? : ]
|
|
| Top |
|
|
|
|
Post subject: Posted: November 29th, 2005, 1:02 pm |
|
Joined: 04 June 2005
Posts: 1095
Location: West of the Moon, East of the Sun, and Several Miles from Anywhere
|
Springie wrote: Another thing, is something I've been struggling with for some time. Can't find the answer. How do I blend images? (Not sure about terminology here.) That is, how do I make one image gradually flow into another? Someone recommended gradient on a layer mask but that's not working for image to solid color, for example. (And anyway not the result I'm hoping for...) What I normally do is just use the Eraser - it should automaticly be set to be a circle with faded edges - to get rid of the parts I don't want. I usually have it set to about 200 pxls wide, but it depends on the pic (how big or small it is (I wouldn't use 200 on a avvie - probably just 50 or maybe 75), and how gradual I want the blend to be).
I almost never use a black background, either - I just leave it transparent. _________________ <center>  Gun-toting vikings? That's your theory?
</center>
|
|
| Top |
|
|
|
|
Post subject: Posted: November 29th, 2005, 5:28 pm |
|
Joined: 07 June 2005
Posts: 2370
Location: England, normally in my room
|
^ Explained better than I ever could  _________________ <center>
|
|
| Top |
|
|
|
|
Post subject: Posted: December 2nd, 2005, 6:53 pm |
|
Joined: 12 July 2005
Posts: 8885
|
|
how can u make words transparent??
_________________ 
I was cured all right.
|
|
| Top |
|
|
|
|
Post subject: Posted: December 3rd, 2005, 8:52 am |
|
Joined: 07 June 2005
Posts: 2370
Location: England, normally in my room
|
On the layers palette, make sure your text layer is selected and go to the 'Fill' or 'Opacity' boxes--adjust them to get them more transparent _________________ <center>
|
|
| Top |
|
|
|
|
Post subject: Posted: December 18th, 2005, 1:56 pm |
|
Joined: 28 June 2005
Posts: 2310
Location: USA
|
I have a question...
On the HP one, I wanted to do an effect like that.
Original pic:

Then, I paste the black and white thing and then set it to overlay, but then it ends up like this:

I was wondering if you could help...thanks! (ignore the gray thing...)
_________________
<center>
<a href="http://raindrops.lemon-drop.net/">Between the Rain Drops</a>
[ + @ # ? : ]
|
|
| Top |
|
|
|
|
Post subject: Posted: December 18th, 2005, 2:16 pm |
|
Joined: 07 June 2005
Posts: 2370
Location: England, normally in my room
|
|
You mean that it is too bright?
_________________ <center>
|
|
| Top |
|
|
|
|
Post subject: Posted: December 18th, 2005, 2:19 pm |
|
Joined: 28 June 2005
Posts: 2310
Location: USA
|
|
Yeah, basically. Do you just use a less brighter color?
_________________
<center>
<a href="http://raindrops.lemon-drop.net/">Between the Rain Drops</a>
[ + @ # ? : ]
|
|
| Top |
|
|
Who is online |
Users browsing this forum: No registered users and 6 guests |
|
You cannot post new topics in this forum
You cannot reply to topics in this forum
You cannot edit your posts in this forum
You cannot delete your posts in this forum
You cannot post attachments in this forum
|
Powered by phpBB © 2000, 2002, 2005, 2007 phpBB Group
Boyz theme by Zarron Media 2003
|
|


