Rules      FAQ       Register        Login
It is currently June 22nd, 2025, 4:32 am

All times are UTC - 5 hours [ DST ]


Post new topic Reply to topic  [ 87 posts ]  Go to page Previous  1, 2, 3, 4, 5, 6  Next
Author Message
 Post subject:
PostPosted: February 17th, 2006, 12:33 pm 
Balrog
Balrog
User avatar

Joined: 04 June 2005
Posts: 3742
Location: Somewhere, far far away...

Offline
Thank you so muchos Oro!! You use PS 7 don't you?

_________________
<center>&& au'er since 06/07/04 &&
Image
x.98% of teens will try, does or has tried smoking pot. If you're one of the 2% who hasn't, copy & paste this into your signature..x
</center>


Top
 Profile                  
 
 Post subject:
PostPosted: February 17th, 2006, 12:35 pm 
Istari
Istari
User avatar

Joined: 07 June 2005
Posts: 2370
Location: England, normally in my room

Offline
But what would it go under? Image effect, Icon tutorial, or what? :confused: If it was Icon tutorial, I can do it so I can show you how to make the eyes and lips shiny, too...

And yeah, I do :)

_________________
<center>
Image Image Image


Top
 Profile       WWW            
 
 Post subject:
PostPosted: February 17th, 2006, 12:36 pm 
Istari
Istari
User avatar

Joined: 27 September 2005
Posts: 2895
Location: Germany

Offline
I think Image Effect, how to make it look glossy and add the tear


Top
 Profile       WWW            
 
 Post subject:
PostPosted: February 17th, 2006, 1:55 pm 
Istari
Istari
User avatar

Joined: 07 June 2005
Posts: 2370
Location: England, normally in my room

Offline
<B>Image Effect 004.</B> <I>Originally written for Pearl Evenstar</I>
<font size=1>Image courtesy of Lost Multimedia</font>

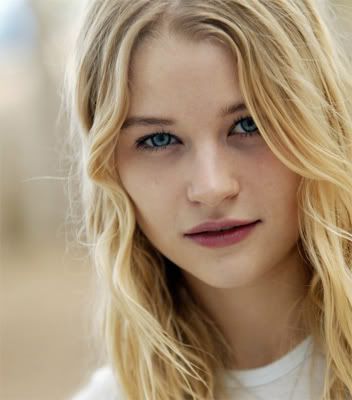
I'll be going from this:
Image

To this:

Image

1. I open up my image; in this case, a lovely picture of Claire Littleton from the TV show <I>LOST</I>.

2. I go to Filter>>Sharpen>>Sharpen.

3. I duplicate the layer and set in to Screen, like so:

Image

4. I then duplicate that layer and set that to Soft Light, like so:

Image

5. Go to Layer>>Flatten Image and duplicate this layer.

6. Go to Filter>>Blur>>Smart Blur and set the settings like this:

Image

7. Now pick up the Blur Tool [R] and with strength 50%, start softening the bits where the image has become jagged.

Image

8. Now, if you want, you can lower the opacity of this layer, but not too much. I lowered mine to 77%. Now flatten the image.

9. Now, this is the tear effect. Pick up the Burn tool [O], it looks like a hand making a circle, making sure the colour you're using is black. You need to make sure you have a small, round brush selected, otherwise it won't look right. I've used a brush size of 4px, but this can be smaller or bigger depending on the size of the image you're using.

10. Now, you need to be careful how you do this, otherwise it doesn't look realistic. Try and find a picture of a person crying if you're not sure. I generally try and start from this point:

Image

... and work my way down. So, using your burn tool on 100% exposure, draw your tear. Try and follow the curve of the cheek rather than drawing a straight line, and don't try and make it perfect. Tears don't fall perfectly, remember! This is what mine looks like:

Image

11. If you want, you can also use the burn tool underneath the eyes as well, to make it look more dark--but I'd suggest lowering the opacity to about 40%, unless you want them to look completely goth :P

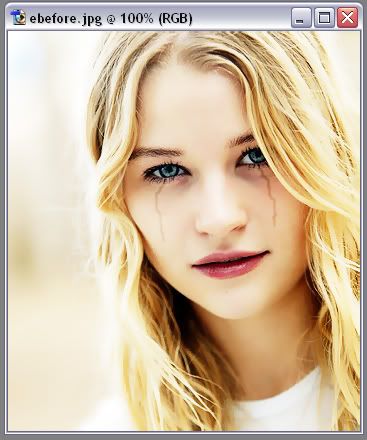
12. Now, this part is for editing the eyes and lips. On the lips, you can make them more glossy by picking up the Sharpen tool [it looks like a triangle] and running it over the lips. Try not too do it too much, though, because you'll make it pixellated. Try and stick to doing the bottom lip, too. Here's what mine looks like:

Image

13. Picking up the Dodge Tool [looks like a line with a circle on the end], and using it on the highlights in the lips looks nice too. Try and use a small brush again; I used 1-2px, depending on the highlight. The burn tool on the shadows of the lips looks great too.
Image

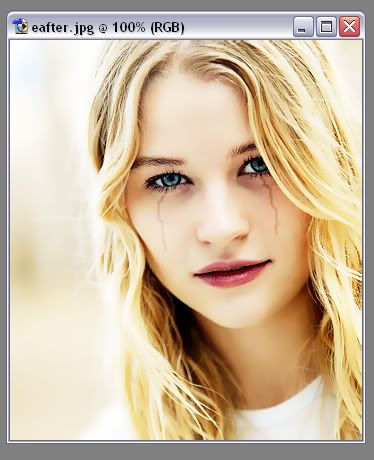
14. Now, for the eyes, use the dodge tool on the white part of the eye, and on the highlights. Again, use a small brush.
Image

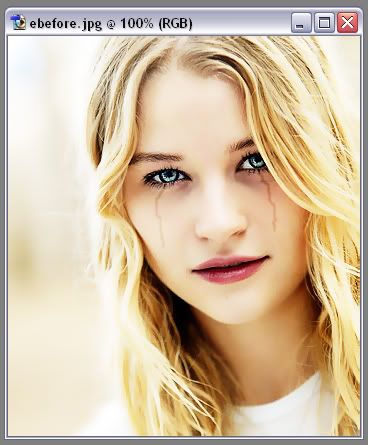
15. Also, use your dodge tool to light the bottom half of the iris--but not too much! You can use the sharpen tool to make it more glassy, and the burn tool for darker areas, like the pupil and the outside of the iris. You might want to zoom in when doing this.
Image

16. Now we're going to make the eyes and lips stand out even more, by lowering the saturation of the rest of the image. This is fiddly but looks good :D Pick up the Ellipictal Marquee Tool [looks like a dotted circle] and put the feather to 1px.

17. Select one of the eyes using the tool, then hold down the Shift button and select the other. It's probably a good idea to zoom in if it's a small image.

Image

18. Now pick up the Lasso Tool [looks like a lasso rope] and make sure the feather is set to 1px. Holding down the Shift button again, select the lips, making sure to make the selction joins up.

Image

19. Now go to Select>>Inverse, then Image>>Adjustments>>Hue/Saturation.

20. Now lower the "saturation" to a level that looks good to you. I lowered mine to -31.
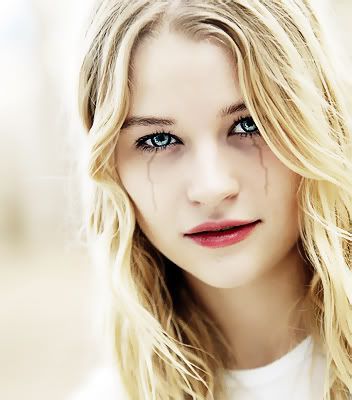
Image

And you're done! It's a bit of a long, fiddly, process, but I think it looks great :D If you have a question, just ask!

_________________
<center>
Image Image Image


Top
 Profile       WWW            
 
 Post subject:
PostPosted: February 17th, 2006, 2:29 pm 
Istari
Istari
User avatar

Joined: 27 September 2005
Posts: 2895
Location: Germany

Offline
Thanks so much Oro! :hug:


Top
 Profile       WWW            
 
 Post subject:
PostPosted: February 17th, 2006, 2:44 pm 
Istari
Istari
User avatar

Joined: 07 June 2005
Posts: 2370
Location: England, normally in my room

Offline
You're welcome, Bubs :hug:

_________________
<center>
Image Image Image


Top
 Profile       WWW            
 
 Post subject:
PostPosted: February 17th, 2006, 3:05 pm 
Balrog
Balrog
User avatar

Joined: 04 June 2005
Posts: 3742
Location: Somewhere, far far away...

Offline
Wow oro tahnks so muchos!!! You're the best cousin ever :P

_________________
<center>&& au'er since 06/07/04 &&
Image
x.98% of teens will try, does or has tried smoking pot. If you're one of the 2% who hasn't, copy & paste this into your signature..x
</center>


Top
 Profile                  
 
 Post subject:
PostPosted: February 17th, 2006, 11:15 pm 
Istari
Istari
User avatar

Joined: 28 June 2005
Posts: 2310
Location: USA

Offline
Thanks for the tuts, Oro! :hug: They REALLY help.

_________________
<center>
<a href="http://raindrops.lemon-drop.net/">Between the Rain Drops</a>
[ + @ # ? : ]


Top
 Profile       WWW            
 
 Post subject:
PostPosted: February 18th, 2006, 7:59 am 
Istari
Istari
User avatar

Joined: 07 June 2005
Posts: 2370
Location: England, normally in my room

Offline
You're welcome :D

_________________
<center>
Image Image Image


Top
 Profile       WWW            
 
 Post subject:
PostPosted: February 18th, 2006, 11:55 am 
Moderator
Moderator
User avatar

Joined: 06 May 2005
Posts: 15181
Location: Minas Morgul

Offline
[gasp] I didn't notice that you updated --- thank you SO much for the tutorial Oro! Now I'll go brush-happy.


[tacklehugs]

_________________
<center>

THE HALLOWFEST 2010
<a href="http://www.arwen-undomiel.com/forum/viewtopic.php?t=20958">information here</a>


</center>


Top
 Profile                  
 
 Post subject:
PostPosted: February 18th, 2006, 1:54 pm 
Maia
Maia
User avatar

Joined: 04 June 2005
Posts: 4449
Location: Northern USA

Offline
Oo! 3 new tuts I'll have to try out!! :D Thanks Oro! :hug: You're amazing!

_________________
Image
<center>icon & banner by me
skyward-thoughts
</center>


Top
 Profile       WWW            
 
 Post subject:
PostPosted: February 20th, 2006, 2:19 am 
Istari
Istari
User avatar

Joined: 04 June 2005
Posts: 2071
Location: Lothlorien

Offline
wow thanks oro ive always watned to learn how to do that!

_________________
<center>
www.silent-knight.net
Image
Yo ho, haul together, hoist the colors high... Heave ho, thieves and beggars, never say we die

</center>


Top
 Profile       WWW            
 
 Post subject:
PostPosted: February 20th, 2006, 7:17 am 
Istari
Istari
User avatar

Joined: 07 June 2005
Posts: 2370
Location: England, normally in my room

Offline
Glad they help all of you! :)

_________________
<center>
Image Image Image


Top
 Profile       WWW            
 
 Post subject:
PostPosted: February 20th, 2006, 12:16 pm 
Balrog
Balrog
User avatar

Joined: 08 January 2006
Posts: 3132
Location: The Shire
Gender: Female

Offline
ya definately!!! i'm new @ this whole picture/banner/ stuff, but ur tuts help A LOT!!!!!! :-D

_________________
Image

"Great art is as irrational as great music. It is mad with its own loveliness."


Top
 Profile                  
 
 Post subject:
PostPosted: February 20th, 2006, 2:03 pm 
Gondorian
Gondorian
User avatar

Joined: 04 June 2005
Posts: 362
Location: Shire

Offline
yaaaaaaay ye made my tutorial!!!!! *huggles to death*


yay, i'm off to try it!!!! ;D

_________________
Image

My Site - Alba Illuminata


Top
 Profile       WWW            
 
 Post subject:
PostPosted: February 25th, 2006, 2:15 pm 
Gondorian
Gondorian
User avatar

Joined: 04 June 2005
Posts: 254
Location: Basque Country

Offline
I luv these tutorials Oro! They help me a lot!

_________________
Image
<If>


Top
 Profile                  
 
Display posts from previous:  Sort by  
Post new topic Reply to topic  [ 87 posts ]  Go to page Previous  1, 2, 3, 4, 5, 6  Next

All times are UTC - 5 hours [ DST ]


Who is online

Users browsing this forum: No registered users and 0 guests


You cannot post new topics in this forum
You cannot reply to topics in this forum
You cannot edit your posts in this forum
You cannot delete your posts in this forum
You cannot post attachments in this forum

Jump to:  


Powered by phpBB © 2000, 2002, 2005, 2007 phpBB Group
Boyz theme by Zarron Media 2003